Monday, November 28, 2016

Strawberry Potpies

I cheated when making this potpies! I have a can of strawberry pie filling bought ages ago and wanted to use it up. So I've used it to make this potpies. Originally, the recipe is called Cherry Potpies, and it uses sour cherries in jars, which is very expensive. And since I have a can of strawberry pie filling, I've replaced with that instead. 


Very easy pie to make, the dough is flaky, tender and buttery. But I was very dissappointed with the canned strawberry pie filling. It is starchy and not what I've expected. Though it is not very sweet, and even with chunks of strawberry pieces in the filling, it really lack the natural taste of strawberries. This would be the last time I'll buy strawberry pie filling in cans! And I have a can of blueberry pie filling, though of another brand, bought at the same time. Hopefully that would be much better than this strawberry pie filling.


Maybe one of these days, I would make this potpies again using fresh plums, fresh strawberries or even tropical fruits like mangos.

Cheesy Herb Popovers

A repost :

Do you like eating Popovers? Have you tried baking "Popovers" before? We like eating Popovers and they are really easy to make. Popovers are made with just eggs, flour and milk, and the flavours can varies between sweet and savoury or just plain, eaten with jam. Our favourite in my house are the savoury ones. Popovers are baked using popover pans, but muffins pans works out great. I baked mine using muffins pans, just be sure to grease them really well, so that they pop out easily. There are no leavening or yeast used for making popovers, as they bake, the steam causes the hollow in the centre, making the thin batter rises really high, and they will collapse, not long after baking. Though this recipe I've tried, remained quite puffy, deflating only a little, even after almost an hour after baking.
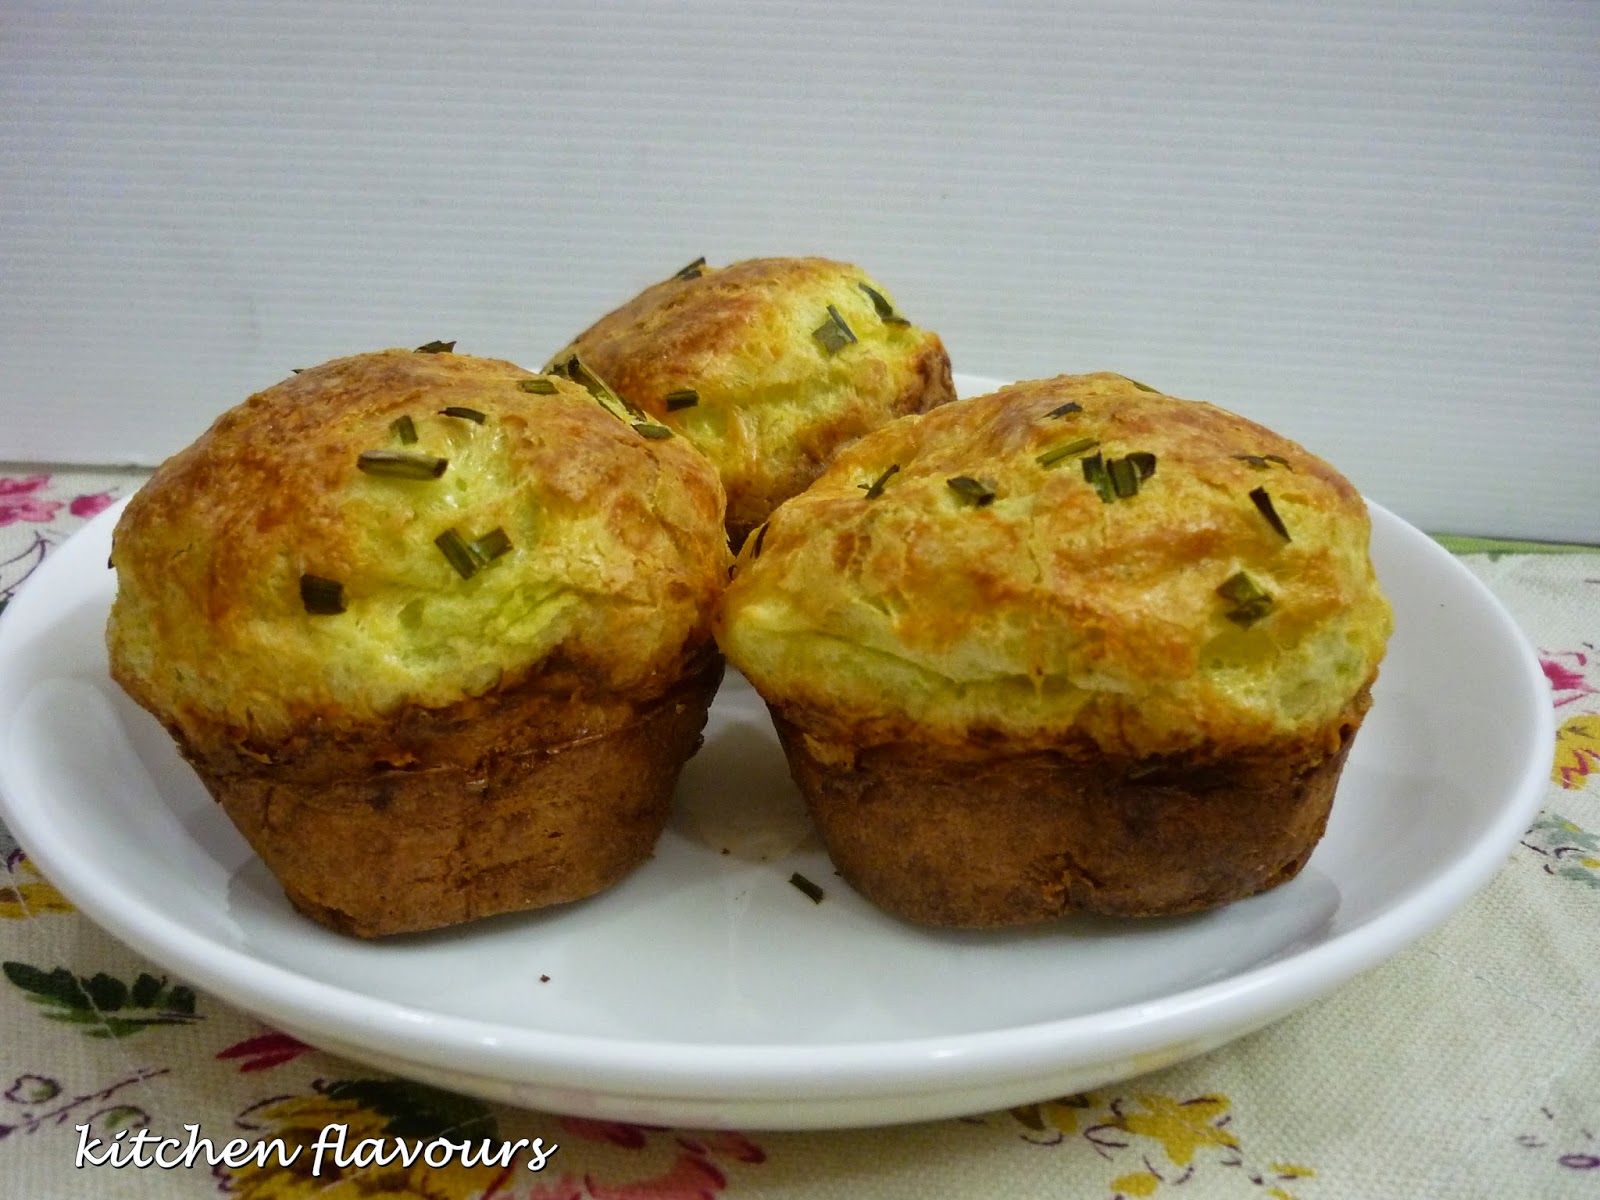


These are really super easy to make. All the ingredients are mixed in a blender and poured into greased muffin pans and bake! The only thing I added is more chives. Recipe states to add about a scant teaspoon of any fresh herbs, I've used chives, since I have some chives in my garden pot. And have used about 1-1/2 tablespoons for the batter, plus additional for sprinkling over the top. The blended batter has a light tinge of green because of the chives, and smells really nice.


Make sure the muffin pans are well greased. Pour the batter evenly among the 12 muffin cups, and sprinkle the top with some chopped chives and some shredded cheddar cheese. From the photo above, the green colour of the batter cannot be seen, as the green is very light.


Bake in a preheated oven at 220C for 20 minutes, then reduce the temperature to 180C, and bake for a further 15 minutes until they are golden brown and puffy. I like to watch the process of the popovers puffing up! The second photo, about 10 minutes after the placing the tray in the oven, the popovers are already puffing up.


Reduce the temperature as directed in the recipe and bake for a further 15 minutes or until they are golden brown and yummy looking!


Nice and golden. Delicious and fun to eat! Eat it while it is still hot and fresh from the oven.
The kitchen smells of cheese and chives while these are baking. I like the smell of melting cheese as they bake. So good.


This is really, really yummy! Look at the hollow centre. The crust is so crispy, especially the top, really delicious with the "melted-turned-crispy cheese", while the insides are soft and taste "chive-y" good!  Can you see the lightly tinge of green on the inside, that's from the blended chives. All the 12 popovers are gone within an hour.

Wednesday, November 23, 2016

Whoopie Pies with Salted Dulce de Leche

I've made some Dulce De Leche for a tart recipe, and still have more than a jar left. So I'll be using it for various recipes using dulce de leche, which I have bookmarked to try for ages. One of it is, Whoopie Pies with Salted Dulce de Leche.

Even though Whoopie Pies are listed as under Cookies, they are really cake-like, and to me, are really little mini cakes. Sandwiched with some filling, they make nice little snacks. The dough for these cookies are really very thick batter, which needs to be refrigerated for 2 hours to firm up before shaping into small balls.


You will need to wet your hands when shaping tablespoons of the thick batter into little rounds and place on a parchment lined baking sheet, spacing them slightly apart, and pressing them down a little. These cookies are baked for just 8-10 minutes until puffed and slightly firm. Leave to cool on pans for 5 minutes, then tranfer to the wire racks to cool completely.

The filling is made of ; butter, confectioners' sugar, a little heavy cream, salt and dulce de leche. I have reduced the amount of the confectioners' sugar to half. I like this filling, as it is not too sweet, even with the dulce de leche, very nice actually.


Spread some filling on the flat side of one cookie and top with another cookie, with flat side on filling. The recipe indicate to refrigerate the whoopie pies for at least 1 hour until the filling is set. But there's really no need for that, the filling is firm enough that it holds very well. Plus we could not wait to taste it right away!


I was expecting these cookies to be on the sweet side, but surprisingly the sweetness is just right. Maybe because I reduced the brown sugar for the batter slightly, by using about 3 tablespoons less than the amount stated in the recipe. The cookies are a little chocolaty bitter and goes perfectly well with the not-so-sweet filling. Very nice! For those who love a sweeter cookie, use the full amount of brown sugar as per the recipe.

I keep the leftovers in the refrigerator and they are as good on the next day.


The Whoopie Pies cookie is soft, chocolaty, moist and perfect with the salted Dulce de Leche filling.

Sunday, November 13, 2016

Peach Butter Shortbread

This recipe for Peach-Brown Butter Shortbread is a Smitten Kitchen's recipe, and it is one of the recipes featured in "Home Baked Comfort" by Kim Laidlaw.

One of the ingredient used in Peach-Brown Butter Shortbread squares is brown butter. Butter is melted over medium-low heat and is heated and boiled until it turns brown and starts to smell nutty, stir frequently to avoid burnt. Then it is transfered to a heatproof bowl and freeze for 30 minutes just until solid but not completely frozen. Well, I made the brown butter but did not use it! Simply because at the end of 30 minutes, the butter is still in liquid state, and did not seem to harden at all. Since I was in a rush, I did not want to wait, so I've used a new block of cold butter instead, cut to cubes before adding to the rest of the ingredients for the shortbread. 


The handy food processor is great in mixing the shortbread dough, and it was done in just seconds. Two thirds of it (recipes says 3/4) is used as the base, pressing them firmly on the bottom of a greased baking tray, which I lined with parchment paper. I've used canned peaches, drain, sliced them thinly, about 1/4-inch thick. Arrange the sliced peaches over the shortbread dough in the pan. Scatter the remaining shortbread dough over the top of the peaches.


Bake until golden brown. Leave to cool and cut into squares to serve.


I brought the whole tray to my sister's house that evening, and we've enjoyed it with scoops of ice cream.


Thursday, November 3, 2016

Apple-Cinnamon Hand Pies

I bought some Fuji apples a few weeks ago, and maybe I bought too many! Got to use them up and what better and delicious way than an apple pie? In this case, it's hand pies! Recipe is from Home Baked Comfort by Kim Laidlaw, and so far I have had success with all the recipes I've tried.


I started by making the flaky pie dough in the morning, and by late afternoon, we have warm fragrant apple pie for tea time treat. Fuji apples, it's one of my favourite apples to use for baking. The apples are peeled, cored and cut into small cubes, then mixed with some brown sugar, ground cinnamon, lemon juice and a tablespoon of flour. Once the dough is done, it is rolled out and cut out into 6 or 7 inches rounds, using a bowl as a guide. Brush some egg mixture along the border of half of each rounds. Scoop some filling and place in the centre of the round, bring the sides of the dough together and press to seal. Use a fork to press the borders. Brush the top of the dough with more egg mixture. The recipe did not say anything about slashing the top, but I made a couple of slashes, to allow steam to escape during baking. I've used a 5-1/2 inch bowl as a guide to cut out the rounds and the dough yields 9 rounds for 9 pies.

Bake until golden brown, and the juices are bubbling and oozing from the slashes.


Freshly baked, still warm, about to be served!


Yum! The pie crust is flaky, buttery and crisp tender. Juicy soft apple filling and fragrant from the cinnamon. There's a vanilla glaze which is drizzled over the baked pies, (given in the recipe), but I have omitted the glaze. I let the baked pie rest for 10 to 15 minutes before eating. So good when eating the still warm pie, but be careful when biting into the filling, it's hot! We did not miss the glaze at all, the pie is very good even without it. With a mug of warm tea, this is the perfect afternoon snack.

Wednesday, October 19, 2016

Nutty Mulberry Financiers

Raspberry is very expensive and it is not always available. So I've used some frozen mulberries, of which I've collected and kept frozen, from my one and only small little mulberry plant in a pot. Since financiers uses only egg whites instead of whole eggs, this is a great way of using up the frozen egg whites accumulating in my freezer!


These financiers are gluten-free, using almond meal, hazelnut flour and rice flour. I have reduced the sugar to 80gm and the sweetness was just right. A vanilla bean is split, seeds scraped out and both the seeds with it's pod, and butter is placed in a small saucepan, over medium heat until the butter melts, starts to brown lightly and smells nutty. I have however omitted the vanilla bean, and have used vanilla extract which is added to the batter later. Let the butter cool slightly.

Beat the egg whites to the dry ingredients, add the butter in three batches, mixing well after each addition. I've added the vanilla extract at this stage. Divide the batter between the muffin cups and bake for 18-20 minutes. This recipe yields 6 muffins instead of  8. 


Just before serving, dust with confectioners' sugar.


Moist, soft with nutty aroma. The mulberries works out great. These little gluten-free mini cakes, as the author says, "They are the perfect afternoon snack served alongside a hot cup of tea".

Note : This recipe is courtesy from La Tartine Gourmande.


Saturday, October 8, 2016

Super Banana Bread

 Another keeper recipe. If you have some leftover bananas that are begging to be used, make this quick bread!


A lovely bread. I've made half a recipe for one loaf, so have used only half the amount of the ingredients listed in the recipe, with a further reduction in the amount of brown sugar used ; for half a recipe, I've used only 1/4 cup, and it is sweet enough. The bananas are very sweet to begin with!


I like the crumb texture of this quick bread. It is moist, soft and light, not as dense and heavy as some bananas bread tend to be. I will be making this again when I have leftover bananas.  

I've made half a recipe for one loaf, using half amount of the ingredients listed, with some changes to the following :
use nutmeg powder instead of freshly grated
use 1/4 cup light brown sugar
omitted the sprinkling of the turbinado sugar


Thursday, September 22, 2016

Pepperoni and Egg Breakfast Tart

A savoury bake that is perfect for brunch or as a light lunch. It is quick, easy and delicious. If you have a pack of frozen puff pasty in the freezer, thaw it overnight in the refrigerator, and by breakfast or lunch time the next day, you will be able to serve this savoury tart in less than half an hour.

The actual recipe is named Bacon-And-Egg Breakfast Tarts, but I do not have any bacon. However, I do have a pack of pepperoni which I wanted to use up. The pepperoni makes a delicious substitute. Or even slices of ham will be good too.


I've made this tart before with bacon, when I first purchased this book. And we really enjoyed it at that time. Definite worth a repeat! I've used a 4 inch square of puff pastry sheet bought from the supermarket, makes it so much easier, as there's really no need to measure and cut to size. Perfect size for individual serving.

The puff pastry is scored on all sides to make a border, then spread in the centre of the pastry to the cut lines,  with a mixture of cheddar cheese and sour cream. Bacon or pepperoni slices are pan-fried just until barely crisped. Place a few pieces on the cheese mixture and bake the tart in a preheated oven until the pastry is puffed, crispy and golden, takes about 15-18 minutes. Meanwhile fry the eggs to your liking.

When the pastry is ready, place a fried egg on top of each one, sprinkle some black pepper and chopped chives over, and serve immediately. With a cup of warm tea, would be very nice.


I drizzled some hot sauce over my eggs. Yums! Enjoy!

In the author's own words "Make these for a special brunch, especially if you want to impress your friends or in-laws."  

Monday, September 12, 2016

S'mores Brownies

I am not a fan of marshmallows but both my son and daughter likes it. I wanted to make this S'mores Brownies, and was looking for a particular brand of marshmallows which I sometimes buy, and great in bakes, but could not find it in the few supermarkets that I went to. So I grabbed a pack of those available, and use them to bake these brownies. 


The marshmallows barely melt and it was quite disappointing as they are looking forward to melting gooey marshmallows on top of the brownie. From now on, I'll just stick to the usual brand of marshmallows that I always buy.


Recipe calls for graham crackers which are lightly crushed to be added to the brownie batter, but I have omitted that and replaced with dried cranberries instead. And I have also reduced the amount of both the white and brown sugars to 1/2 cup caster sugar and scant 1/3 cup brown sugar.


The brownies are moist, very chocolaty and even though the marshmallows barely melt, they are quite soft, so that is not so bad after all!  I like the dried cranberries in the brownies. These brownies are best enjoyed with a glass of cold milk.

Tuesday, August 30, 2016

Butterscotch Custards

Made a sweet and creamy custard dessert, with butterscotch flavour and added whisky. The whisky is optional, and of course, I could not let it be without! I've used bourbon.

This dessert is really pretty easy and simple to make. First of all, you would need to make the butterscotch by melting the butter over low heat and adding in the brown sugar, cook until the sugar starts to bubble, then the cream is added in. Stir until the mixture is smooth and slightly thickened, then pour in the milk. Stirring constantly, slowly pour in the lightly beaten egg yolks. Add in the vanilla extract, whisky and salt. Pour the custard mixture through a fine-mesh strainer into a pitcher.

Divide the mixture evenly among the custard cups, place in a baking tray, and fill the tray with hot water to reach halfway up the sides of the custard cups. Bake for 25-30 minutes, until the custard is set and will still jiggle slightly when the cups are lightly shaken. Let the custard cool slightly, remove the cups from the water bath, let cool on wire rack for about 20 minutes. Cover the top of each custard by pressing a piece of plastic directly on top of the custard to prevent a skin from forming. Chill the custards for a minimum of 4 hours or overnight. 


I chilled the custard overnight.


These custards are supposed to be served with dollops of whipped cream over the top. But I have served it plain!


Delightful custards. It is a little on the sweet side, but very creamy and smooth. I like the butterscotch flavour with a hint of the whisky. Very, very, nice!


Wednesday, August 17, 2016

Lemon Cream Scones

Made these buttery scones for afternoon tea time snack. Lovely scones! Buttery, tender, lemony and wonderful with a cup of warm tea.


I did not make the glaze which is optional, to be drizzled or brush over the scones before serving. 


Tender Lemon Cream Scones with my homemade Orange Cardamom Jelly and a cup of warm Earl Grey tea. 

Tuesday, July 19, 2016

Cinnamon-Oatmeal Cookies

Another keeper recipe from this awesome book. If you like chewy oatmeal cookies, then you would probably love this. There's a few variations as to the add-ons, like raisins, dried currants, or chocolate chips. While the author love hers with chocolate chips, I like my oatmeal cookies with raisins.


As usual, I've reduced the amount of both the brown and granulated sugars, by half, which for us, the sweetness was just right. I've baked the cookies 3 minutes longer than the recipe indicated. When eating them just barely warm, the sides are a little crisp and the centre soft and chewy. The next day, these cookes are chewy throughout, which is really very nice.


Fragrance with the cinnamon, sweetness from the raisins and chewiness of the oats, makes these cookies a great snack to nibble on anytime of the day. And even as a midnight snack! 

One thing to take note is that, while the recipe states that it yields about 2-1/2 dozen cookies, I got exactly 4-1/2 dozens! And I did follow the required cookie size by following the instructions of  "drop heaping teaspoonfuls of dough onto the prepared pans" !

Note : my changes to the recipe
1/2 cup loosely packed light brown sugar
scant 1/2 cup granulated sugar
use 1/2 teaspoon each baking soda and baking powder


Tuesday, July 12, 2016

Blueberry-Almond Crisp

Made this delicious Blueberry-Almond Crisp, and I thought that this sounds like a crumble to me. When I googled from the internet, I am even more confused! LOL! Some articles mentioned that topping for crisp contains oats, butter and flour and a crumble usually do have use any oats. And some articles mentioned that the topping for crumbles usually have oats, butter and flour, occasionally some nuts are added. Whatever it is called, both are served with scoops of ice cream! At least everyone agrees on this! 


The recipes uses blueberries, but I do not have enough of blueberries, so I have added some chopped ripe mangoes. Toss the fruits together with some sugar and flour. I've made half a recipe to serve 4.


The topping is a mixture of granulated sugar, brown sugar, flour, butter, oats and flaked almonds, Sprinkle the mixture over the fruits and bake in the oven for 35-40 minutes until the topping is golden brown and the fruits are bubbling. Let it cool slightly before serving.


Serve this  Blueberry and Mango-Almond Crisp while still warm, with a scoop (or two!) of ice cream. We had this with my homemade Vanilla Ice Cream. What can I say, this is one delicious dessert! So good!

Sunday, June 26, 2016

Ham, Leek and Cheddar Quiche

According to the author, "Quiche is one of the most versatile dishes you can make. It can be varied with the seasons; accomodate a spectrum of cheeses, vegetables, and meats; and be served for breakfast, lunch, or dinner. This is one of my all-time favourite quiche combinations."

Quiche is a favourite in my house, and I have made many versions of quiches, with different meats and vegetables. When I saw the photo of this recipe in the book, I knew that I will have to give this a try sooner or later! I like how the long slices of leeks arranged over the top, sprinkled with cheese and bake to a golden delicious colour.


Long slices of leeks sauteed in butter, is arranged on top of the filling.


The crust is pretty easy to handle. I've used a rectangular tart pan with dimensions 8x12-inch. The flaky pie dough in the recipe is for a single 9" round crust. So I have made one and a half recipe for both the dough and the filling to fit my pan. Follow the usual steps for making the crust dough as instructed in the recipe, and the steps for blind-bake.

The filling is made by sauteing the sliced leeks until wilted and the diced ham is added in. An extra leek is sliced lengthwise and then saute in butter until wilted. In a large glass measuring jug, whisk the eggs, milk, sour cream, a pinch of salt and black pepper. Scatter the leek and ham mixture onto the prepared crust, pour in the milk mixture, then arrange the long leek slices, followed with the sprinkling of cheese over the top. I have used Cheddar cheese as Gruyere cheese is not easy to find over here. Bake for about 30 minutes until the top is golden.


Sprinkle some Cheddar cheese over the top. 


 Freshly baked and smells good!


Delicious quiche! Really nice when eaten warm, with a few slices of cucumbers and tomatoes. This would be great for lunch and even dinner with some other side salad. Just as the author says, it is the most versatile dish, for any meal of the day.

Monday, June 20, 2016

Chocolate-Bourbon Bundt Cake

I made this boozy moist chocolaty cake, Chocolate-Bourbon Bundt Cake, for Father's Day. Another fabulous recipe from my selected cookbook for this month, at Cookbook Countdown #6Williams-Sonoma : Home Baked Comfort by Kim Laidlaw.


Made only half a recipe and used my half-sized bundt pan with a 6-cup capacity. I've reduced the sugar slightly, using scant 3/4 cup and for the bourbon, 1/4 cup plus 1 tablespoon. For half a recipe, I've baked the cake for 35 minutes.

As for the glaze, I find that when left to room temperature (as instructed in the recipe), it has thickened considerably and quite impossible to pour over the cake. I have therefore stirred in more cream, a little cream at a time, until I get the consistency I want.


This cake is delicious. It is moist, chocolaty bitter, though in a delicious way. And I can definitely taste the bourbon in it, very, very nice! Top with the chocolate glaze, this makes a wonderful cake for any celebration, though, with the amount of bourbon used, definitely not for young kids! Served with a scoop of homemade vanilla ice cream, this is a divine dessert treat! As with cakes like this, the taste gets even better the next day.


Wednesday, June 15, 2016

Coconut and Lime Shortbread


My next bake : Coconut and Lime Shortbread


Firstly, I've got to say that this is one of the best shortbreads, ever! According to the author, "A good shortbread cookie should be buttery and tender, crumbly and toothsome". And these are exactly that! 

The dough is easy to put together, only thing is do not overknead. It is then refrigerated for about 30 minutes. Once the dough is taken out from the refrigerator, work quickly as it softens rather fast. If it is too soft to handle, refrigerate the dough again before proceeding. Sliced to size, prick with a fork and scatter some sugar over the top. Bake until golden at the edges about, 22 minutes.  

There's lightly toasted shredded coconut and zest of a lime in the dough. And while the shortbread are baking, they smell delicious!


Buttery, tender, crispy, crumbly and so, so good! I've enjoyed snacking these Coconut and Lime Shortbread with a mug of hot black coffee. Another keeper recipe from this fabulous book! 

Monday, June 13, 2016

Mini Chocolate Chip-Almond Muffins


These little muffins are so easy peasy to make. I made them on the spur of the moment when I felt like baking something. Recipe uses cold butter straight from the refrigerator, cut into chunks and beat with almond meal and sugar till creamy and the rest of the ingredients are added in accordingly. I have used ready bought almond meal for the batter instead of using sliced almonds which is to be processed in the food processor with the sugar until finely ground. If you can get hold of almond meal, makes it much easier. I've added the zest from one orange as per suggested in the recipe for variation, but did not sprinkle on the flaked almonds.

Recipes says that it will yield about 3 dozen, but I got about 84 mini muffins! It was a good thing I had 4 sets of 24-hole mini muffin pans!


These were baked for 11 minutes and they rise with little humps on top and looks very cute in little red cups.


It was suggested in the recipe to serve these muffins warm. While they were very good when freshly baked and warm, we find that they tasted even better the next day. Very addictive, we find it is hard to stop at just 2 or 3. These were moist, soft and so yummy! Perfect with a glass of cold milk, hot coffee, cocoa or tea, take your pick! This is a keeper!


Thursday, June 9, 2016

A Good, Honest Sandwich Bread

I'm using one of my favourite baking books for Cookbook Countdown #6 this month, Home Baked Comfort by Kim Laidlaw. She has a few bread recipes in the book, and I wished that she had more! This is the third bread recipe I've tried and so far I like them all, especially the soft and fluffy Cranberry Bread which I've made before. 


I like how she called this bread, "A Good, Honest Sandwich Bread". While I was making this bread, with the book opened on this recipe page, my son took a peek to see what bread I was making, and he had a good laugh at the name of the bread, as he thought it was funny calling a bread "honest"! But just as the author said, this is really "A Good, Honest Sandwich Bread"! 

The recipe makes 2 loaves, but I've made only half a recipe for one loaf. I've replaced both the flours in the recipe with bread flour. This is an easy, straight forward bread to make, nothing fussy about it. The dough is easy to work with. 


This bread, as the author describes, "is both moist and lightly dense and is superb for anything from turkey or grilled cheese sandwiches to cinnamon toast and eggy French toast".  I agree, this is a very nice bread, with light dense crumbs, yet soft in texture. I ate a piece on its own as it is quite tasty! We had it for breakfast with some tuna spread, and a mug of hot coffee.